Stone chips are the blight of any car owner who regularly uses the motorway. Flung at already high speeds, your car then hurtles towards these small rocks with impending doom. The loud ‘whack!’ as the stone hits the bodywork makes you cringe. It’s guaranteed there’s now a tiny crater where it mashed itself into your car’s paintwork.
Whether you’ve collected a dozen of these or just one, they’re an ugly eyesore that needs repairing. If left, they can start to bubble out once water gets underneath the paint and even rust if subject to harsh winter weather and sub-zero conditions.
Some people opt for a respray job, but as written about in the past, they can usually be dealt with much more cost-effectively by using a Chipex car touch up paint repair kit.
Stone chip repair costs can be high with a respray, and it’s often an unnecessary thing to do, so let’s have a look at how you can repair paint chips yourself, using a Chipex paint repair system and in just a few simple, quick and easy steps.
Chipex gives a 100% paint match guarantee and can supply paint kits for a huge amount of different car makes. Use our ‘find your car colour code’ tool to discover your car’s exact paint match.
Next, order your Chipex kit in the size you require, either 12, 24, or the ‘heavily chipped’ kit, and wait eagerly by the door for the postie to deliver it.
Important: This product is not suitable for vehicles that have been recently painted. It is recommended that you allow at least one month for the original vehicle paint to cure from the time of painting.
Best way to repair paint chips on your car
One of the best and most effective ways to fix paint chips on your car is to do it yourself with a Chipex touch-up paint repair kit. By fixing chips and light scratches yourself, you can make your car look and feel brand new again without the need for expensive and often unnecessary resprays.
Paint chips from stones and debris on the road are impossible to avoid. During the winter months, the damage can be made worse as water and ice can affect the metal, so it’s important to repair the paint as soon as possible.
With Chipex, you can expect seamless, professional results thanks to the high-grade blending and polishing solutions. The Chipex repair kits are a cost-effective, simple solution that can be reused repeatedly whenever your car requires it. The system will even fix deep stone chips; however, you will need to build up the paint in layers to achieve good results.
How much does it cost to repair rock chips in car
If you went to a garage to get all of the rock chips in your car professionally repaired, you could potentially be looking at hundreds of dollars, depending on the damage.
These kits are excellent value for money, especially as they can be used repeatedly and offer fantastic cosmetic results.
How to repair paint stone chips using a Chipex kit
Using the Chipex touch-up paint kit to repair rock chips in car paint couldn’t be easier and shouldn’t take much time at all. Follow the steps below for the best way to repair paint chips on your car.
1. First, you’ll want to clean the paint stone chips and surrounding area thoroughly. Make sure to remove any sealant, wax, or polish from the chipped area.
2. Put on the rubber gloves that come with the kit. These are actually used in the application of the paint.
3. Shake the paint Step 1 Paint bottle well, and then use the supplied Chipex paint applicator brush® to dab the paint onto the chipped areas. If the car has suffered ‘road rash’ (lots of small paint stone chips in one area), put the paint onto a fingertip of the glove, and smear evenly across the road rash, making sure they are all filled.

Note: drying time takes between 40 seconds and 5 minutes, depending on the ambient temperature and amount of paint you’ve applied.
4. Wait for the paint to be dry to the touch. This can take anywhere between 40 seconds and 5 minutes, depending on the temperature and the amount of paint applied.
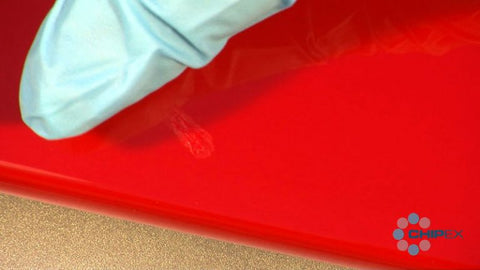
5. Once the paint is dry, apply the blending solution to the paper cloth and wipe across the painted areas with light pressure. Again, leave to dry for a few minutes before moving to the next stage.

6. Take Step 3 Finishing Polish, apply a small amount to a soft microfiber cloth and rub gently across the painted areas. Allow this to dry and haze, and then remove the haze with a clean cloth area.
7. Apply a small amount of finishing polish to a soft microfiber cloth and rub gently across the painted areas. Allow this to dry and haze, then remove the haze with a clean section of the cloth.

Tips:
– For large or deep stone chips: repeat stages 3 and 4 of this guide to build up layers of paint until the chip is filled properly
– Should you make a mistake, panic not! Use the Step 2 Blending Solution and start again. Easy.
– If the weather is cold, Chipex recommend using their chip repair system above (around 0˚C / 32˚F), to reduce the drying process.
If you’ve applied the Chipex system correctly, your stone chip repair should be a success, and you’ll hardly notice where the ugly marks had been. You’ve also protected the area from rust and bubbling – brilliant!

Before (left) and after (right) using Chipex – all the stone chips are gone.
Stone chip repair tips
-For large or deep stone chips, you can repeat the process multiple times to build up layers of paint until the chip is properly filled.
-If you’ve made a mistake, there’s no need to panic! Use the blending solution supplied to remove the paint and start again.
-It’s recommended that the Chipex paint repair kit is used in temperatures above 0˚C to reduce the drying process.
By following our guide and tips, your stone chip repair should be a success! You’ll hardly notice where the chips and scratches had been. Plus, the treated area will be protected from rust and bubbling.
Get professional results with Chipex
You can achieve seamless, expert results with the Chipex car paint touch-up kit. Please take a look at some of these fantastic before and after pictures sent to us by real customers.
For more information about our system, take a look at the Chipex FAQs.
Also, find out how to use a Chipex repair kit for car bumper damage
Find Your Car's Paint Color
- Choosing a selection results in a full page refresh.
- Press the space key then arrow keys to make a selection.